Monday, September 12, 2016

Mushroom Risotto by Angela Seah Thulin


I still remember the very first time I had risotto. It was in Italy and I was served with one BIG plate! Of course I couldn't finish so the waiter asked - why, was it not nice?? It was just too big of a serving and it was my first time. It was far too creamy for my taste too. 

This was my first attempt to do it myself and I must say it is quite easy to cook (but you must make sure to stir all the time) and both hubby and son gave thumbs up.


Facebook link - https://www.facebook.com/sassyangelakitchen/photos/a.233724286834172.1073741832.233664896840111/581805942026003/?type=3&theater

Ingredients -
250g Arborio or Carnaroli risotto rice 
250g of mixed wild mushroom and shitake
4 cups of chicken stock
3 tbsps olive oil
1 small onion (finely chopped 100g)
1 tbsp minced garlic
100ml dry white wine
1/2 tsp dry thyme
10g butter
50g parmesan cheese
salt and pepper 


Steps -
1. Rinse and pat dry the mushrooms. Separate the caps from the stems, slice them into large piece or more or less the same size.
2. Heat up the chicken stock over low flame.
3. In a pan - heat 1 tbsp of olive oil, add half of the onion and garlic in. Cook until translucent. Then add the mushrooms, thyme and butter in. Stir to mix well. Saute the mushrooms for few minutes until they lose their juices and brown slightly. Add salt and pepper in, mix well and remove from heat.
4. In another pan - heat 2 tbsps olive oil,add the other half of onion and garlic in follow by adding the rice. Keep stirring until rice turns translucent. 
5. Add the wine in and let it cook till reduce almost entirely. Add one ladle full of hot chicken stock. Continue to cook, uncovered, stir continuously until the rice has fully absorbed to liquid. Ladle by ladle add the rest of the stock , leaving time for the rice to absorb the stock. In twenty minutes the rice should be both ''al dente'' and creamy.
6. At the end of the cooking, remove from heat, add the grated parmesan and the saute mushrooms. Mix well. Serve!

Notes -
1. I used 4 cups of water with 1/2 chicken knorr cube.
2. I used about 1/4 tsp salt and a dash of black pepper.
3. I did a quick rinse to the Arborio twice.
4. Optional - truffle oil to drizzle after cooked.


Thursday, August 11, 2016

3-flavor Chiffon Cake by Angela Seah Thulin


I love this combination! Can you tell it is very soft too??


So soft and fluffy!

Facebook link - https://www.facebook.com/sassyangelakitchen/photos/a.469362976603634.1073741842.233664896840111/568462436693687/?type=3&theater

Ingredients - 

Part (A)
4 eggs yolks
2.5 tbsp granulated sugar
80ml water
60ml vegetable oil
1.5 tsp vanilla essence
80g cake flour, sieve

Part (B)
4 egg whites
2.5 tbsp granulated sugar
1/4 tsp corn flour

Part (C)
1 tsp dark cocoa powder (I used Hershey's dark cocoa)
1 tsp cocoa powder
1 tsp fresh pandan juice (concentrated part)

Steps -
1. In a clean metal bowl, Part A - whisk the egg yolks and sugar until pale and fluffy (for about 8 minutes). Then add water, vegetable oil, vanilla essence in and whisk till mixed. Add sifted cake flour and whisk till well-combined (batter will look runny). Set aside.
2. In another clean metal bowl, Part B - whisk the egg white till soft peak then add sugar and continue whisking. Add corn flour and whisk till stiff peak formed. Set aside.
3. Fold part B into part A gently using a balloon whisker.
4. Divide the batter evenly among 3 bowls. From part C - add 1 tsp to each bowl. Fold in the powder gently and mix well.


5. Then scoop/design as you like into an ungreased 18cm tube pan.
6. Bake at preheated oven 160 degrees celsius for 30 - 40 minutes or until toothpick inserted center comes out clean. Invert the pan and let it cool completely.

Notes - 
1. Every oven's temperature varies. I baked 150 degrees celsius for 40 minutes with aluminum foil covered when the top has turned brown. 


Wednesday, August 10, 2016

Steamed Sago Kueh (Kuih Sago) by Angela Seah Thulin


Facebook link - https://www.facebook.com/sassyangelakitchen/photos/a.469369326602999.1073741845.233664896840111/566843463522251/?type=3&theater

Ingredients - 450g sago
350g gula melaka
120ml water
1 stalk of pandan leaves
oil
steaming tray
grated coconut / desiccated coconut


Steps -
1. Soak the sago in cold water for 25 minutes. Then drain and set aside.


2. Cut the gula melaka sugar into slices. 


3. In a small sauce pot, add the water, gula melaka and pandan leaves in. Cook until gula melaka/sugar melt. Sieve it and set aside.


4. Mix the soaked sago and sugar together.


5. Brush your steaming tray with some oil, pour the above point 4 in and put to steam in boiling water for 20-25 minutes.


6. Remove and set aside to cool. Cut into bite size cube and coat with grated or desiccated coconut. Serve! 


Notes -
1. I used a 23cm disposal aluminium tray to steam this.
2. This recipe serves 4-6 pax, quite a big portion, you may wish to half the recipe.

Saturday, August 06, 2016

Peppermint Meringue by Angela Seah Thulin


Facebook link - https://www.facebook.com/sassyangelakitchen/photos/a.233719563501311.1073741831.233664896840111/565192030354061/?type=3&theater


Ingredients -
3 egg whites (100g)
100g granulated white sugar/caster sugar
1/4 tsp cream of tartar
1/4 tsp peppermint essence
Opt - food coloring

Steps -
1. In a clean metal bowl with mixer, beat the egg whites on low-medium speed until foamy. Then add the cream of tartar and continue beating until soft peaks.
2. Add the sugar gradually and continue beating in medium speed until it forms stiff peaks. Add the peppermint essence (and food coloring if desired) and quick whisk. Fold in chocolate chips if desired.
3. Transfer the meringue into pastry bag and pipe on baking paper. Alternatively, you may wish to use two spoons (if you add chocolate chips) onto the baking paper.
4. Bake at preheated oven 95degrees celsius for 1 1/2 hours or more. Turn off the oven, open the door ajar (I used my baking glove and placed it at the oven door) and leave it to dry for hours.

Notes -
1. I baked them for 1 3/4 hours rotating the tray after half time.


Sunday, July 31, 2016

Chocolate Marble Bundt Cake by Angela Seah Thulin


Not sure if you are in the mood for vanilla or chocolate cake? Why not make a cake with both?! Try baking this and you will know how moist and delicious this pound cake is!


Facebook link - https://www.facebook.com/sassyangelakitchen/photos/a.469362976603634.1073741842.233664896840111/562487227291208/?type=3&theater

Ingredients -
140g semi sweet chocolate, break into pieces
290g plain flour, sieved
2 1/2 tsp baking powder
1/4 tsp baking soda
1/2 tsp salt
160g unsalted butter, room temperature
200g granulated white sugar
3 large eggs, room temperature
1 1/2 tsp vanilla essence
80ml sour cream
120ml milk, room temperature


Ganache -
170g chocolate
120ml heavy cream


Steps - 

Butter or spray your bundt or tube pan. 

1. Using double boil method, melt the chocolate. Remove from heat and set aside to room temperature.
2. In a bowl, combine the plain flour, baking powder, baking soda and salt. Set aside.
3. In a clean whisking bowl, beat the butter until smooth. Then gradually add the sugar in and continue whisking till the mixture is light and fluffy.
4. Add the eggs in one at a time. Scrape down the sides of the bowl as needed.
5. Add the vanilla essence and sour cream in and whisk till combined.
6. Add the flour in by 3 additions and the milk in by 2 additions. Beat till its just combined. Do not overbeat.
7. Separate the batter into two equal portions or one of the portions slightly more. Add the cooled melted chocolate to one of the portions. Mix well gently.
8. Scoop the batter to the bundt pan by alternating spoonfuls of vanilla batter with chocolate batter.
9. Use a chopstick or skewer, gently draw swirls through batter to marbleize it. 


10. Bake in preheated oven 180degree celsius for 35-40 minutes or until toothpick inserted center comes out clean. Allow to cool completely.
11. Ganache  - In a small sauce pot, bring heavy cream to a simmer and then remove from heat. Pour the cream onto the chocolate. Let it sit for a minute and then stir to mix well. Ladle the ganache over cooled cake.

This cake is best the day its bake.

Notes - 
1. Every oven's temperature varies. I baked at 160degree celsius for 50 minutes.
2. My chocolate batter weighs 550g (after adding melted chocolate).
3. Recipe call for 250g sugar but I reduced by 50g. 


Recipe origin: Joy of Baking


Thursday, July 21, 2016

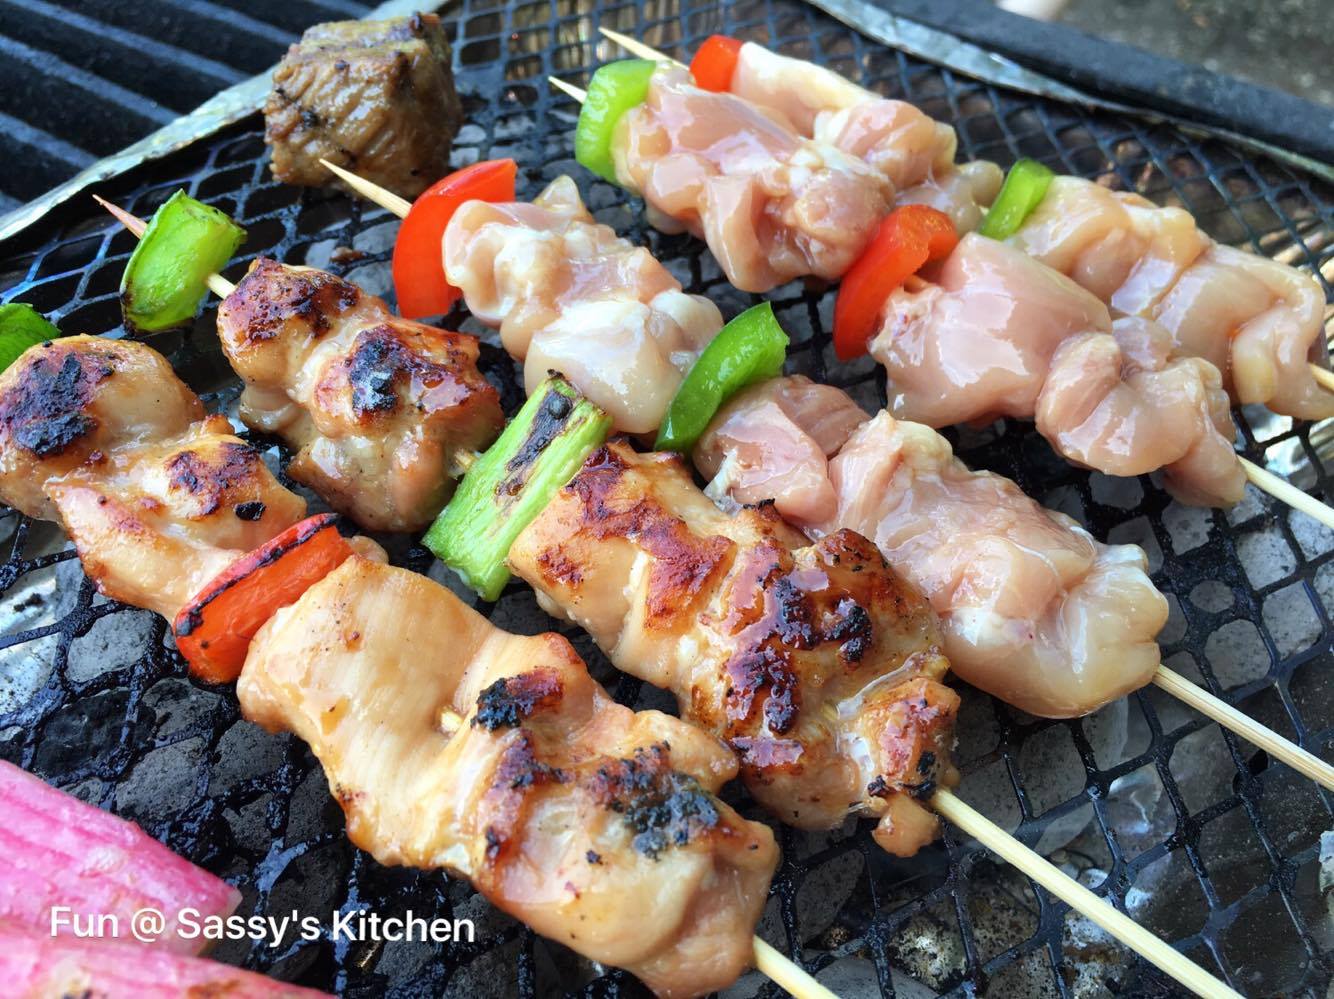
Yakitori by Angela Seah Thulin

Waking up to a hot sun this morning we decided that we would BBQ for dinner. In Sweden most people do this at home on their porch or backyard, but I am Singaporean and in Singapore we always gather at BBQ pits at the seaside or at Chalets. We therefore decided to try this at a nearby park.

I also prepared the food Singapore-style which means sambal sotong, sambal prawns, chicken skewers, crabmeat sticks, marshmallow but "his" beef as well to keep everyone happy!

It is more common for Singaporeans to BBQ chicken wings, but I really love Yakitori and this is how I made them!


Facebook link - https://www.facebook.com/sassyangelakitchen/photos/a.233712673502000.1073741829.233664896840111/558343084372289/?type=3&theater

Ingredients -
500 - 600g chicken boneless thigh meat
Small green and red paprika
scallions
bamboo skewers

Tare sauce
4 tbsp Japanese light soy sauce
4 tbsp water
2 tbsp sake
2 tbsp mirin
1 tbsp granulated sugar
1 tbsp brown sugar
1 stalk of scallion cut into 3cm long

Steps (for grilling) -
1. Soak the skewers in water for at least an hour. 
2. In a small pot, bring the above teriyaki sauce with scallions to a boil in a high heat. Then switch to medium heat and cook for 6 minutes. Then another 2 minutes at medium-high heat. It will slightly thicken. Let it cool completely.
3. Rinse and pat dry the chicken thigh meat, put in a bowl then add 2/3 of the teriyaki sauce and marinate for at least 4 hours. Thread the chicken piece onto skewers alternating with paprika or scallion. 
4. Before hitting the grill, oil the chicken meat to avoid it sticking to the mesh. Grill the meat for a few minutes on each side, brush with the remaining teriyaki sauce and grill until it turns golden brown. 


Steps for using oven -
1. Soak the skewers in water for at least an hour or overnight the best.
2. In a small pot, bring the above teriyaki sauce with scallions to a boil in a high heat. Then switch to medium heat and cook for another 6 minutes.Then another 2 minutes at medium-high heat. It will slightly thicken.
3. Thread the chicken piece onto skewers alternating with paprika or scallion. 
4. In a grill pan brushed with oil/butter, grill the chicken until it turns golden brown.
5. Or In preheated oven 200 degree celsius, bake these for 4 minutes. Remove from oven, brush with teriyaki sauce and flip to the side and bake for another 4 minutes. Remove and brush teriyaki sauce to caramelize the sauce. Bake for another 3-4 minutes and done. About 15 minutes in all.

Notes - 
1. If you have broiler in your oven, First broil the chicken for 6 minutes, brush with teriyaki sauce on both sides and then continue to boil for another 3-4 minutes.


Thursday, July 14, 2016

Nebula Cake by Angela Seah Thulin


After seeing a YouTube video where some girls make what they call a "Space Cake", my son asked me to bake one too!

Well, I'm not exactly an astronomer, but I think I would call this a Nebula cake instead.
Soft vanilla sponge cake in vibrant green, turqoise and purple colors, and while its not exactly what my son wanted - it's difficult not to decorate it with frosting design and pearls. I'm a woman after all.  


Facebook link - https://www.facebook.com/sassyangelakitchen/photos/a.469362976603634.1073741842.233664896840111/555463067993624/?type=3&theater

Ingredients -
110g unsalted butter (room temperature)
145g granulated sugar
2 large eggs
1 tsp vanilla essence
170g cake flour, sifted
2 tsp baking powder
1/4 tsp salt
120ml milk (room temperature)

Frosting - 

300ml heavy cream (36%fat content)
2.5 tbsp sugar
1 tsp vanilla essence
Violet food coloring
*Whisk the heavy cream & sugar then add vanilla essence and food coloring - beat until trails formed (2-3mins). Chill in fridge.

Tools -
Edible food coloring
4 baking pans at 15cm 

Steps - 

1. Butter your cake pans and line the bottom of the pans with parchment paper.
2. In a bowl, beat the butter until soft and creamy. Then add the sugar in and beat till light and fluffy.
3. Add the eggs one at a time. Remember to scrape the sides of the bowl as needed. Add the vanilla essence and beat until combined.
4. Add the flour (with salt and baking powder) in by 3 additions and milk in by 2 additions. Mix till just combined. Do not overbeat.
Preheat oven to 180 degrees celsius 
5. Divide batter evenly among 3 bowls. Using food colors, tint batter in 1 bowl teal, 1 bowl royal blue and 1 bowl violet Mix well.


6. Then scoop/design as you like into each baking pan. The batter in each pan (excluding the pan) will weigh about 140g.


7. Bake at preheated oven 25 - 35 minutes or until toothpick inserted center comes out clean. Let the cake cool completely.

8. Assemble the cake - sandwich the layers together with a little of the frosting and then cover the entire cake with the remaining frosting, smoothing with a palette knife. 

Notes - 

1. Every oven's temperature varies. I baked these together on the middle rack at 160 degrees celsius for 23 minutes.  
2. I'm using wilton colors and they are Teal, Royal Blue and Violet. 


Tuesday, July 12, 2016

Mango Sticky Rice by Angela Seah Thulin


Mango sticky rice - a traditional Thai dessert made with glutinous rice, fresh sweet mango and coconut milk. This is one of my top favorites that is a MUST for me to buy whenever I am in Bangkok or transit any flight via Bangkok airport. At least two boxes each time!


Facebook link - https://www.facebook.com/sassyangelakitchen/photos/a.233719563501311.1073741831.233664896840111/554584138081517/?type=3&theater

Ingredients -
2 ripe mango
180g glutinous rice
200ml coconut cream
1/8 tsp salt
2 tbsp sugar
1 tsp sesame seeds
Opt - pandan leaves

Steps -
1. Rinse and soak the glutinous rice for at least 3 hours.
2. Pour the coconut cream into a small saucepot, add the salt, sugar and pandan leaves. Simmer with low heat until sugar melted. Set aside.
3. Steam the glutinous rice in high heat for 25 minutes. 
4. Scoop the rice to a big bowl and fluff the rice with almost half of the coconut cream. Mix well.
5. Assemble and serve with mango. Topped with toasted sesame seeds and balance coconut cream.

Notes - 
1. I used 2.5tbsp of sugar.


Toast the sesame seeds

Sunday, July 10, 2016

Wonton Soup by Angela Seah Thulin


If you love wanton soup, do give this recipe a try!


Facebook link - https://www.facebook.com/sassyangelakitchen/photos/a.233714530168481.1073741830.233664896840111/553821761491088/?type=3&theater

Ingredients - 
100g Napa cabbage, diced
1/2 tsp salt
1/2 tsp sesame oil

200g minced pork or beef
18g scallions, chopped finely
70g prawns, diced (about 4-5)
1 tbsp tapioca flour
1 tbsp water
1 tbsp sesame oil
3/4 - 1 tsp salt
1 packet wonton skin (200g)
Optional - 2 to 3 chinese mushrooms, soaked and diced


Steps -
1. Napa cabbage - use only the white part of the cabbage. Dice them up, add 1/2 tsp salt to it (this will help to dry up the water) and set it aside for 30 minutes. After that, drain the water and add 1/2 tsp sesame oil to it, mix well and set aside.
2. Slice the prawns into half then diced them.
3. In a big bowl, add the minced pork, tapioca flour, water, sesame oil and salt. Mix them well. Then add napa cabbage, scallions and prawns in. Mix all well.
4. And wrap.

For a simple soup base (or use your own stock) - 
1. Cook the wontons in a pot of boiling water. Boil for at least 6 minutes. Drain and set aside.
2. In a pot, add some olive oil and some cut scallions (3cm long) in. Cook for few seconds in medium heat, then add water in and it come to a boil. Add some chicken powder and salt to taste. Pour this soup into the cooked wontons, white pepper to taste and garnish with more chopped scallions.

Notes -
1. Leftover wontons  - freeze in a single layer and when frozen, put them into a bag and keep it in the freezer. To cook frozen wonton, simply cook them in boiling water/stock FROZEN.